Unlock Your Mac’s Full Potential: How to Free Up Storage Space
Is your Mac running out of storage space? It’s no secret that as you use your computer, files, applications, and temporary data can quickly consume all available storage, slowing down performance. Fortunately, with the right strategy, you can easily free up storage space on your Mac and get it back to running smoothly.
In this comprehensive guide, we’ll show you the most effective ways to free up storage space on your Mac, from clearing out large files to optimizing storage settings. Whether you’re trying to make room for a new macOS update or simply want better performance, these steps will help you reclaim that precious space.
Table of Contents
Why Freeing Up Storage Space Matters
Before diving into how to free up storage space, it’s essential to understand why keeping enough free space on your hard drive is so crucial. When your Mac runs out of storage, it can lead to several issues:
Slower Performance: A lack of free space causes macOS to struggle with basic tasks, such as opening apps or saving files.
Update Issues: New software updates, especially major macOS updates, require a lot of free space to install.
System Instability: When storage is low, your Mac may experience frequent crashes or error messages, which could lead to data loss.
By taking steps to regularly free up storage space, you ensure your Mac remains fast, stable, and up to date.
Step 1: Use Storage Management Tools to Identify Large Files
One of the easiest ways to free up storage space is by using macOS’s built-in storage management tool. This tool gives you an overview of what’s consuming the most space and helps you make decisions on what to delete.
How to Access Storage Management:
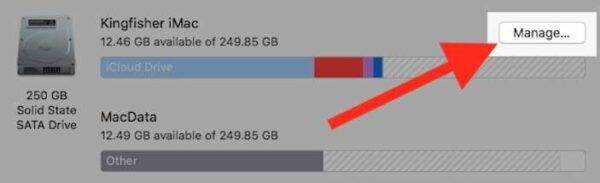
Click the Apple Menu and select About This Mac.
Go to the Storage tab and click Manage.
From here, you’ll be able to see large files, applications, and documents you may no longer need. Start by reviewing these and deleting anything unnecessary to free up storage space.
Step 2: Empty the Trash and Clear Temporary Files
You might not realize it, but your Mac’s Trash can hold onto deleted files for far too long, unnecessarily consuming space. Make it a habit to regularly empty the Trash to instantly free up storage space.
How to Empty the Trash:
Right-click on the Trash icon in the Dock and select Empty Trash.
Additionally, clearing temporary files like cache and browser data can free up storage space. Tools like CleanMyMac X can help automate this process by locating and removing unnecessary temp files, app caches, and more.
Step 3: Remove Unused Applications
Unused applications can take up a surprising amount of storage. Go through your Applications folder and uninstall apps you no longer use. This will help you free up storage space instantly.
How to Uninstall Applications:
Open Finder and go to the Applications folder.
Drag any unused apps to the Trash, then empty the Trash to reclaim storage space.
Step 4: Clear Out Large, Old Files
Large files like videos, high-resolution photos, and unused disk images can eat away at your storage. To free up storage space, use Finder to search for files by size and delete or move them to an external drive or cloud storage.
How to Find Large Files:
Open Finder and click on the Search bar.
Click the + button to add a filter, and set it to search by File Size.
Review the largest files on your system and delete or move any you no longer need.
Step 5: Optimize Storage with iCloud
Apple offers a built-in feature that can help you automatically manage and free up storage space using iCloud. By enabling Optimize Mac Storage, your Mac will store files, photos, and videos in iCloud, freeing up space on your local drive.
Select Optimize Mac Storage to enable this feature.
This ensures that only the most recently used files remain on your Mac, while others are safely stored in iCloud, freeing up space on your hard drive.
Step 6: Remove Old iOS Backups
If you use your Mac to back up your iPhone or iPad, those backups can take up a significant amount of space. Deleting old backups can help you free up storage space on your Mac.
How to Delete iOS Backups:
Open Finder and click on your device in the sidebar.
Go to Manage Backups and delete any old backups you no longer need.
Step 7: Store Files on External Drives
For users who deal with large files frequently (such as video editors or graphic designers), using an external drive can be an excellent way to free up storage space. Move older files or less frequently used data to an external SSD or HDD to keep your internal drive lean and efficient.
Conclusion: Free Up Storage Space and Keep Your Mac Running Smoothly
Taking the time to regularly free up storage space is essential for maintaining a fast and efficient Mac. By using storage management tools, clearing out unnecessary files, and leveraging cloud storage or external drives, you can easily keep your Mac running at peak performance.
For more tips and expert advice on how to free up storage space on your Mac, visit Kingfisher Computers. We offer personalized guidance and troubleshooting services to ensure your Mac stays clutter-free and ready for anything.
The Illusion of Stability in Modern Updates For most users, operating system updates are something that simply happen. They arrive quietly, often installing in the background, requiring little more than…
Macbook Neo, How Does It Compare To Air & Pro? Over the last few years the laptop market has experienced one of the most significant architectural changes in its history.…
Apple’s latest product announcements mark one of the most significant shifts in the Mac lineup in more than a decade. While Apple routinely updates its hardware with faster chips, incremental…
There is a particular kind of frustration that only a slow computer can produce. It is not dramatic. It is not urgent. It does not scream for attention. Instead, it…
In an era where nearly every aspect of personal computer maintenance and professional life is mediated through digital systems, your computer is no longer a luxury device — it is…
Phone says charging but battery not increasing is one of the most frustrating problems smartphone users face. You plug it in.The lightning bolt appears.It says “Charging.” But the battery percentage…
Apple’s rumour cycle always looks like a thousand disconnected leaks — until you line them up and notice the same themes repeating: AI-first silicon, camera and display differentiation, form-factor experiments (foldables / spatial…
Wi-Fi connected but no internet is one of the most frustrating messages you can see on a computer or laptop. The Wi-Fi icon shows full bars.It says “Connected.”But websites won’t…
Unfortunately, there was an error submitting your request.
Please try again later, or reach out to us directly. You can call us at +44 1429 280955 or email us at sales@kingfishercomputers.co.uk for assistance. We’re here to help you get your computer back up and running!
We’ve received your booking, Our team will get in touch with you shortly to confirm the details. You’re one step closer to having your computer fixed! If you have any urgent questions, feel free to contact us. Otherwise, sit back, and we’ll handle the rest.