Running out of storage on your Windows 10 PC can cause your computer to slow down, prevent important updates, and even lead to crashes. Luckily, freeing up disk space is easier than you might think. This guide will show you how to free up storage space on Windows 10 using several methods that will help you reclaim storage and optimise your computer’s performance.
Why Freeing Up Storage Space is Important on Windows 10
Windows 10, like any operating system, requires enough free space to function efficiently. Over time, your system collects temporary files, unused applications, old updates, and other unnecessary data. Without regular maintenance, this can lead to several issues:
Slower Performance: A full hard drive can slow down your PC, making tasks like browsing the web, transferring files, or opening applications take longer than usual.
Update Failures: Windows 10 updates require sufficient free space to install properly. Without enough room, updates may fail or not even download, leaving your system vulnerable.
More Room for Files: By freeing up storage, you’ll have more space for what matters—important files, new applications, and media such as photos and videos.
Table of Contents
7 Effective Ways to Free Up Storage Space on Windows 10
1. Use Windows 10’s Built-In Storage Sense Feature
Storage Sense is a feature in Windows 10 that automatically cleans up temporary files, deletes old downloads, and clears the Recycle Bin. This can be one of the easiest ways on how to free up storage space on Windows 10.
How to enable Storage Sense:
Open Settings > System > Storage.
Toggle on Storage Sense.
Click Configure Storage Sense to set preferences on how often it should clean up your system.
Once enabled, Storage Sense will automatically clear out unnecessary files, helping you maintain free disk space without having to think about it.
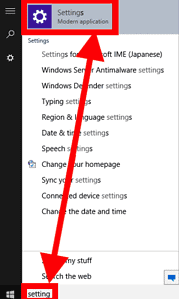
Type “Settings”
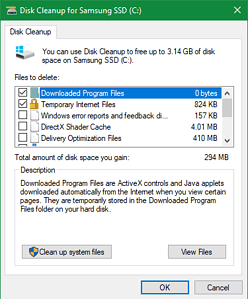
Tick Files You Want To Delete ≫ Remove Files
2. Uninstall Unused Applications
Applications that are no longer in use take up valuable space on your hard drive. Uninstalling these programs is a quick way to free up space.
How to uninstall apps:
Go to Settings > Apps.
Scroll through the list of installed programs.
Select the program you no longer need and click Uninstall.
Some programs can take up gigabytes of space, so clearing out unused apps can make a noticeable difference in storage capacity.
3. Delete Temporary and Junk Files
Temporary files, created during the operation of apps or the downloading of updates, can accumulate over time. Windows provides an easy way to remove them.
How to delete temporary files:
Open Settings > System > Storage.
Under Temporary Files, click Remove temporary files.
Select the types of files you want to delete and click Remove files.
For a deeper cleanup, you can also use third-party tools like CCleaner, which will help remove additional junk files.
4. Empty the Recycle Bin
Even after deleting files, they remain in the Recycle Bin, taking up space. Regularly emptying the Recycle Bin can free up a significant amount of storage.
How to empty the Recycle Bin:
Right-click the Recycle Bin icon on your desktop.
Select Empty Recycle Bin to permanently remove the files.
5. Move Files to an External Drive or Cloud Storage
If your hard drive is filled with large files like videos, photos, or software, consider moving them to an external hard drive or cloud storage service. This frees up local storage while still keeping your files accessible.
Recommended Cloud Storage Options:
Microsoft OneDrive (integrated with Windows 10)
Google Drive
Dropbox
These cloud services allow you to easily access your files from any device while freeing up space on your PC.
6. Disable Hibernation Mode
The Hibernation feature in Windows 10 saves the current state of your system to your hard drive when shutting down. While useful, it can take up several gigabytes of space. If you don’t use hibernation, you can disable it to free up storage.
How to disable hibernation:
Open the Command Prompt as Administrator.
Type powercfg.exe /hibernate off and press Enter.
This will remove the hibernation file from your system, potentially freeing up several gigabytes of disk space.
7. Clean Up System Files with Disk Cleanup
Old Windows updates, log files, and system error dumps can take up significant space on your hard drive. The Disk Cleanup tool helps remove these files.
How to use Disk Cleanup:
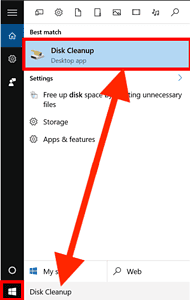
Type Disk Cleanup in the search bar and open it.
Select the drive you want to clean (typically C:).
Click Clean up system files.
Check the categories you want to delete (e.g., Windows Update Cleanup, System Error Memory Dump Files), then click OK.
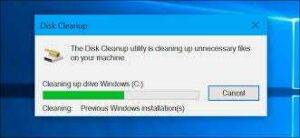
Disk Cleanup can reclaim large amounts of storage by removing unnecessary system files.
Conclusion: Keep Your Windows 10 Storage Optimised
Now that you know how to free up storage space on Windows 10, it’s important to make this part of your regular system maintenance routine. By regularly deleting unused files, uninstalling unnecessary applications, and using tools like Storage Sense, you’ll keep your system running smoothly and efficiently.
If you need further assistance or have more questions, feel free to explore more guides on our website or contact us at Kingfisher Computers for expert support.
The Illusion of Stability in Modern Updates For most users, operating system updates are something that simply happen. They arrive quietly, often installing in the background, requiring little more than…
Macbook Neo, How Does It Compare To Air & Pro? Over the last few years the laptop market has experienced one of the most significant architectural changes in its history.…
Apple’s latest product announcements mark one of the most significant shifts in the Mac lineup in more than a decade. While Apple routinely updates its hardware with faster chips, incremental…
There is a particular kind of frustration that only a slow computer can produce. It is not dramatic. It is not urgent. It does not scream for attention. Instead, it…
In an era where nearly every aspect of personal computer maintenance and professional life is mediated through digital systems, your computer is no longer a luxury device — it is…
Phone says charging but battery not increasing is one of the most frustrating problems smartphone users face. You plug it in.The lightning bolt appears.It says “Charging.” But the battery percentage…
Apple’s rumour cycle always looks like a thousand disconnected leaks — until you line them up and notice the same themes repeating: AI-first silicon, camera and display differentiation, form-factor experiments (foldables / spatial…
Wi-Fi connected but no internet is one of the most frustrating messages you can see on a computer or laptop. The Wi-Fi icon shows full bars.It says “Connected.”But websites won’t…
Unfortunately, there was an error submitting your request.
Please try again later, or reach out to us directly. You can call us at +44 1429 280955 or email us at sales@kingfishercomputers.co.uk for assistance. We’re here to help you get your computer back up and running!
We’ve received your booking, Our team will get in touch with you shortly to confirm the details. You’re one step closer to having your computer fixed! If you have any urgent questions, feel free to contact us. Otherwise, sit back, and we’ll handle the rest.