Ultimate Guide: How to Install Windows 10 on Your Laptop
If you’re looking to install Windows 10 on your laptop, you’re in the right place! Whether you’re upgrading from an older version of Windows or doing a fresh install, this step-by-step guide will help you successfully complete the installation.
Windows 10 has become the go-to operating system for millions of users, offering a perfect blend of performance, security, and features. But knowing how to install Windows 10 correctly is crucial to avoid unnecessary headaches. In this article, we’ll walk you through the process to ensure everything goes smoothly.
Table of Contents
Why Should You Install Windows 10?
Before jumping into the installation process, let’s quickly cover why you should install Windows 10 on your laptop.
Improved Performance: Windows 10 brings faster boot times, better multitasking, and overall enhanced system responsiveness.
Enhanced Security: With regular updates, built-in antivirus protection, and security features like Windows Defender, installing Windows 10 ensures your system stays safe.
Updated Features: Features like Cortana, Microsoft Edge, and virtual desktops are only available on Windows 10, making it a must-have OS for modern users.
Step 1: System Requirements to Install Windows 10
Before you install Windows 10, it’s essential to check if your laptop meets the system requirements. Here’s what you need:
Processor: 1GHz or faster processor or SoC
RAM: 1GB for 32-bit or 2GB for 64-bit
Hard Disk Space: 16GB for 32-bit OS or 20GB for 64-bit OS
Graphics Card: DirectX 9 or later with WDDM 1.0 driver
Display: 800 x 600 resolution or higher
If your laptop meets these minimum requirements, you’re good to go and can proceed with the steps to install Windows 10.
Step 2: Back Up Your Data
Before you make any changes to your laptop, it’s crucial to back up your data. Installing Windows 10 can result in the loss of files if not done correctly, so make sure to save important documents, photos, and videos.
How to Back Up Your Data:
Connect an external hard drive or use cloud storage like OneDrive or Google Drive.
Copy all essential files and folders to your chosen backup solution.
Ensure that you have a copy of everything important before proceeding with the Windows 10 installation.
Step 3: Create a Bootable USB Drive to Install Windows 10
Now that your files are backed up, it’s time to create a bootable USB drive to install Windows 10.
Run the tool and select Create installation media (USB flash drive, DVD, or ISO file) for another PC.
Choose the language, edition, and architecture (32-bit or 64-bit) that matches your laptop.
Insert a USB drive (at least 8GB), select it, and follow the prompts to create your bootable USB.
Once the USB is ready, you’re set to begin the installation process.
Step 4: Install Windows 10 on Your Laptop
Now comes the fun part—actually installing Windows 10!
How to Install Windows 10:
Insert the bootable USB drive into your laptop.
Restart your laptop and press the appropriate key (usually F12, F2, or DEL) to enter the Boot Menu.
Select the USB drive as the boot device.
Follow the on-screen instructions to start the Windows 10 installation process.
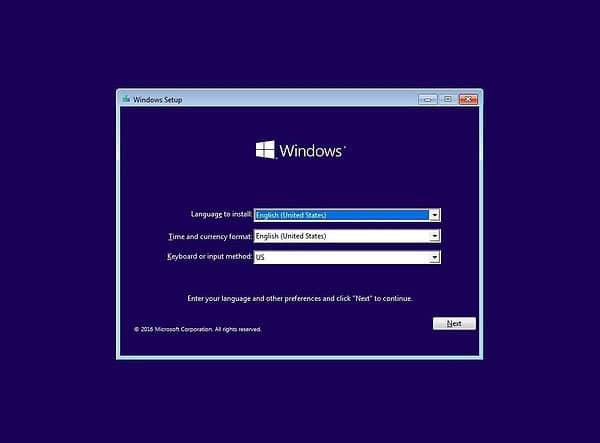
You’ll be prompted to select your language, time, and keyboard settings. Afterward, you’ll be given the option to either upgrade from an existing Windows version or perform a clean installation.
Step 5: Complete the Installation and Set Up Windows 10
Once the installation process begins, it may take anywhere from 15 to 60 minutes, depending on your laptop’s speed. After the Windows 10 installation is complete, your laptop will restart, and you’ll be guided through the setup process.
Windows 10 Setup:
Connect to Wi-Fi and sign in with your Microsoft account (or create one if you don’t have one).
Customize your privacy settings, including location services and speech recognition.
Set up Windows Hello (facial recognition or fingerprint) if your laptop supports it.
Step 6: Activate Windows 10
After you’ve successfully installed Windows 10, the final step is to activate it using your product key. This ensures that your copy of Windows is genuine and allows you to receive regular updates.
How to Activate Windows 10:
Open Settings and click on Update & Security.
Select Activation and click Activate.
Enter your product key, which you should have received when purchasing Windows 10 or your laptop.
If you don’t have a product key, you can still install Windows 10, but certain features will be restricted until activation.
Troubleshooting Common Installation Issues
While the process to install Windows 10 is generally straightforward, you may encounter some issues along the way. Here are a few common problems and solutions:
1. Not Enough Disk Space
If you don’t have enough free space on your hard drive, Windows will alert you. To free up space, try deleting unused files, uninstalling unnecessary programs, or moving files to an external drive.
2. Missing Drivers
If you experience hardware issues after installing Windows 10, it’s likely due to missing or outdated drivers. Visit your laptop manufacturer’s website to download the necessary drivers.
Conclusion: Should You Install Windows 10 on Your Laptop?
In conclusion, installing Windows 10 on your laptop is a great way to ensure you’re running the latest and most secure version of Windows. The process is relatively straightforward, and by following this guide, you’ll be able to complete the installation without a hitch.
Ready to install Windows 10 and enjoy all the new features and improved performance? Follow the steps outlined above, and if you run into any problems, don’t hesitate to contact Kingfisher Computers for expert assistance.
The Illusion of Stability in Modern Updates For most users, operating system updates are something that simply happen. They arrive quietly, often installing in the background, requiring little more than…
Macbook Neo, How Does It Compare To Air & Pro? Over the last few years the laptop market has experienced one of the most significant architectural changes in its history.…
Apple’s latest product announcements mark one of the most significant shifts in the Mac lineup in more than a decade. While Apple routinely updates its hardware with faster chips, incremental…
There is a particular kind of frustration that only a slow computer can produce. It is not dramatic. It is not urgent. It does not scream for attention. Instead, it…
In an era where nearly every aspect of personal computer maintenance and professional life is mediated through digital systems, your computer is no longer a luxury device — it is…
Phone says charging but battery not increasing is one of the most frustrating problems smartphone users face. You plug it in.The lightning bolt appears.It says “Charging.” But the battery percentage…
Apple’s rumour cycle always looks like a thousand disconnected leaks — until you line them up and notice the same themes repeating: AI-first silicon, camera and display differentiation, form-factor experiments (foldables / spatial…
Wi-Fi connected but no internet is one of the most frustrating messages you can see on a computer or laptop. The Wi-Fi icon shows full bars.It says “Connected.”But websites won’t…
Unfortunately, there was an error submitting your request.
Please try again later, or reach out to us directly. You can call us at +44 1429 280955 or email us at sales@kingfishercomputers.co.uk for assistance. We’re here to help you get your computer back up and running!
We’ve received your booking, Our team will get in touch with you shortly to confirm the details. You’re one step closer to having your computer fixed! If you have any urgent questions, feel free to contact us. Otherwise, sit back, and we’ll handle the rest.