Ultimate Protection: Backing Up Your Data in Windows 7 to Secure Your Files
In today’s fast-paced digital world, your data is your lifeline. Whether it’s personal photos, business documents, or sensitive information, data loss can cause chaos. With Windows 7 no longer receiving updates from Microsoft, the risks of losing valuable files due to system failures, malware, or accidental deletion have increased significantly.
But here’s the good news—backing up your data in Windows 7 is not only easy but essential to ensure that all your important information stays safe. This step-by-step guide will walk you through the best methods to back up your data, ensuring peace of mind even if the unexpected happens.
Table of Contents
Why Backing Up Your Data in Windows 7 Is Essential
Since Microsoft ended support for Windows 7 on January 14, 2020, the operating system no longer receives vital security patches or bug fixes. This leaves your computer vulnerable to various threats such as malware, ransomware, and system crashes. Data loss can occur in several ways:
Cyberattacks: Without regular updates, your system is more susceptible to viruses, malware, and ransomware.
Hardware Failure: Hard drives have a lifespan, and a sudden failure can wipe out your entire data set.
Accidental Deletion: One mistaken click could lead to the loss of important files.
But don’t worry—with the right backup strategy, you can avoid these dangers and protect your information from disaster.
Step 1: Choosing the Best Backup Solution for Backing up your Data in Windows 7
Before diving into the actual process of backing up your data, it’s essential to pick the right backup method that suits your needs. Windows 7 provides several options, and you can also choose external or cloud-based solutions for added protection.
Option 1: Backup to an External Hard Drive
The easiest and most straightforward way to back up your data is using an external hard drive. This method allows you to store a copy of your files safely away from your computer, protecting your data from system crashes or malware infections.
How to back up your data using an external hard drive:
Connect your external hard drive to your computer via USB.
Use Windows Backup and Restore (explained in Step 2) to copy your important files.
External hard drives are ideal for large data backups and provide a cost-effective, offline solution.
Option 2: Cloud-Based Backup Services
If you’re looking for extra protection, consider using cloud storage solutions such as Google Drive, Dropbox, or Microsoft OneDrive. Cloud-based backups store your data remotely, which means your files remain safe even if your computer or external hard drive fails.
Upload your files to the cloud manually, or use automatic synchronization to ensure your files are always backed up.
Step 2: Using Windows 7’s Built-In Backup and Restore Feature
One of the simplest methods to back up your data in Windows 7 is by using the built-in Backup and Restore tool. This feature enables you to schedule regular backups and ensures that all your important files are safely stored.
Here’s how you can use Windows Backup and Restore:
Open Backup and Restore:
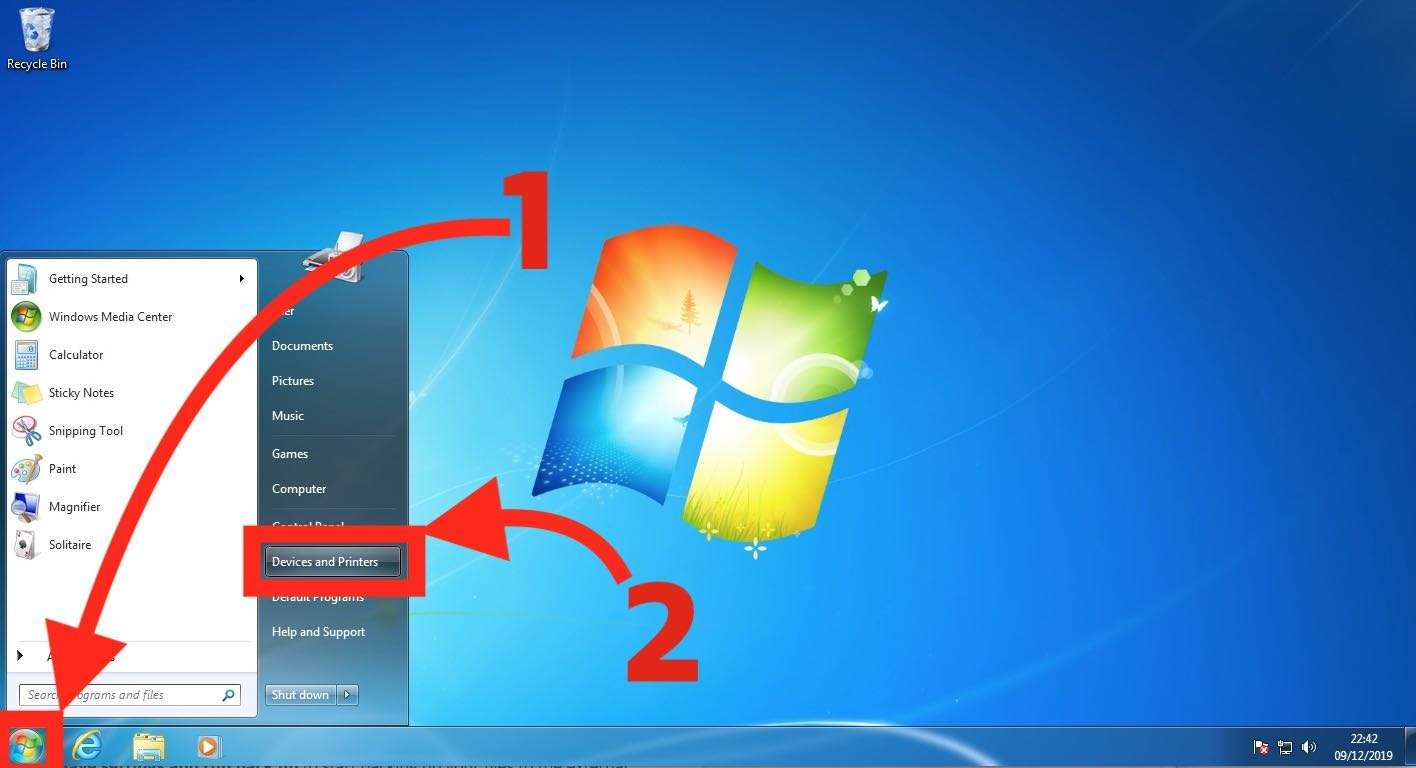
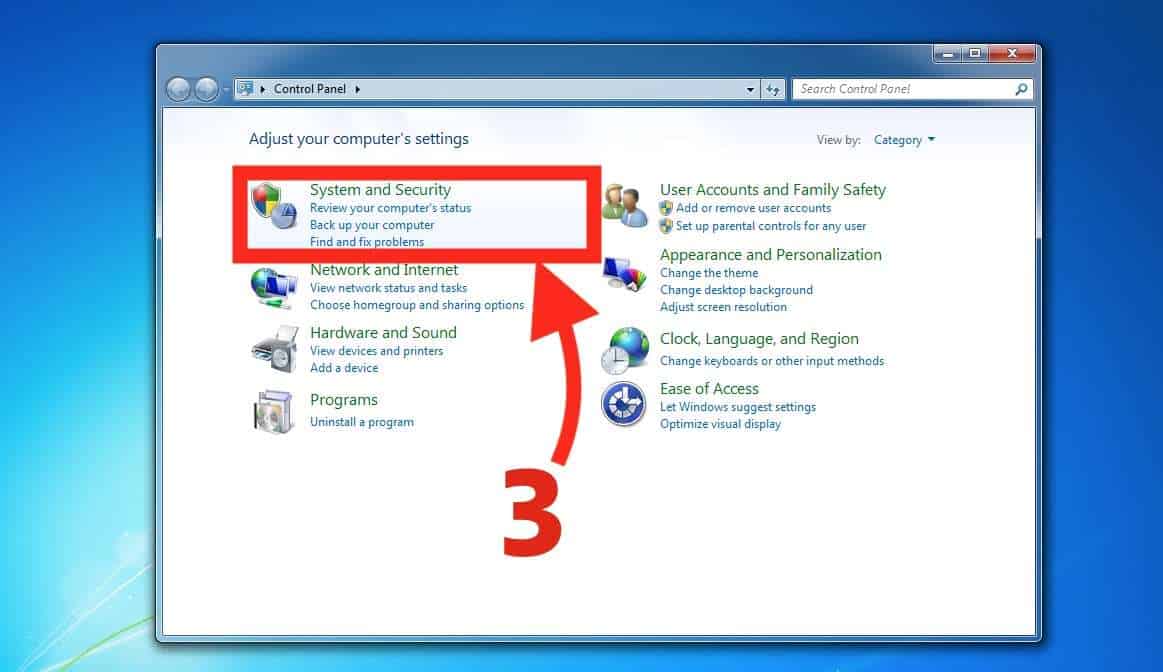
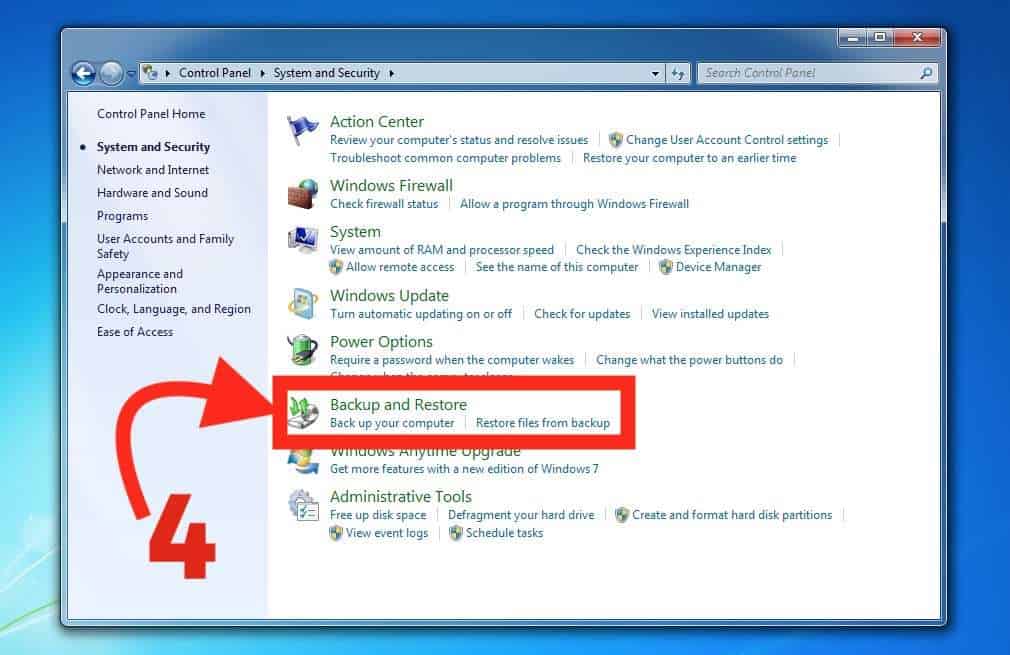
Click the Start button and navigate to Control Panel > System and Security > Backup and Restore.
Set up your backup:
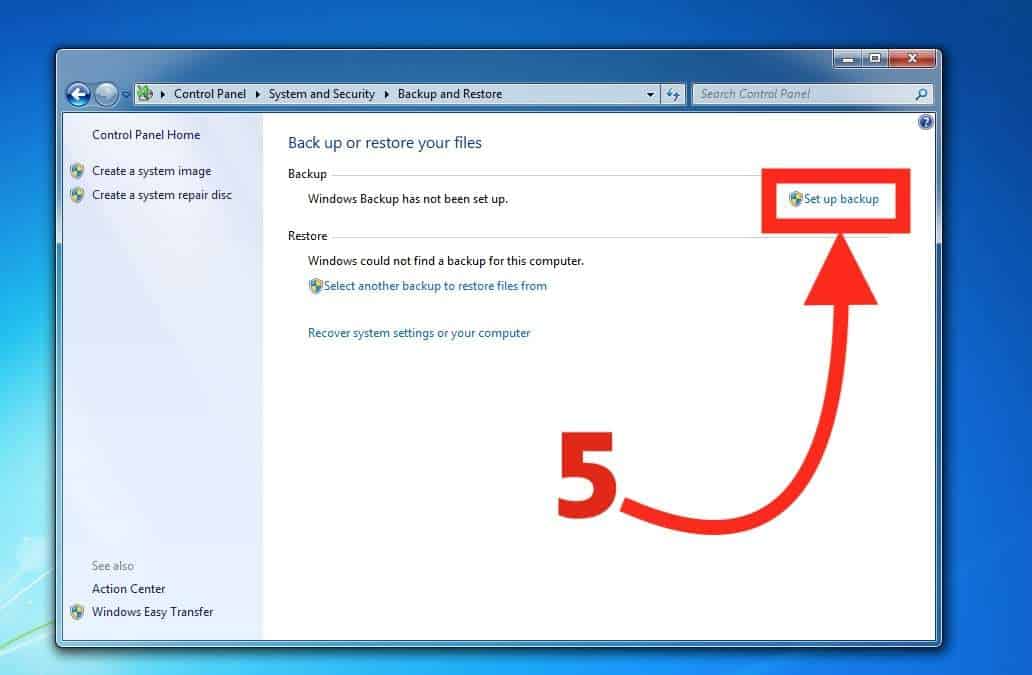
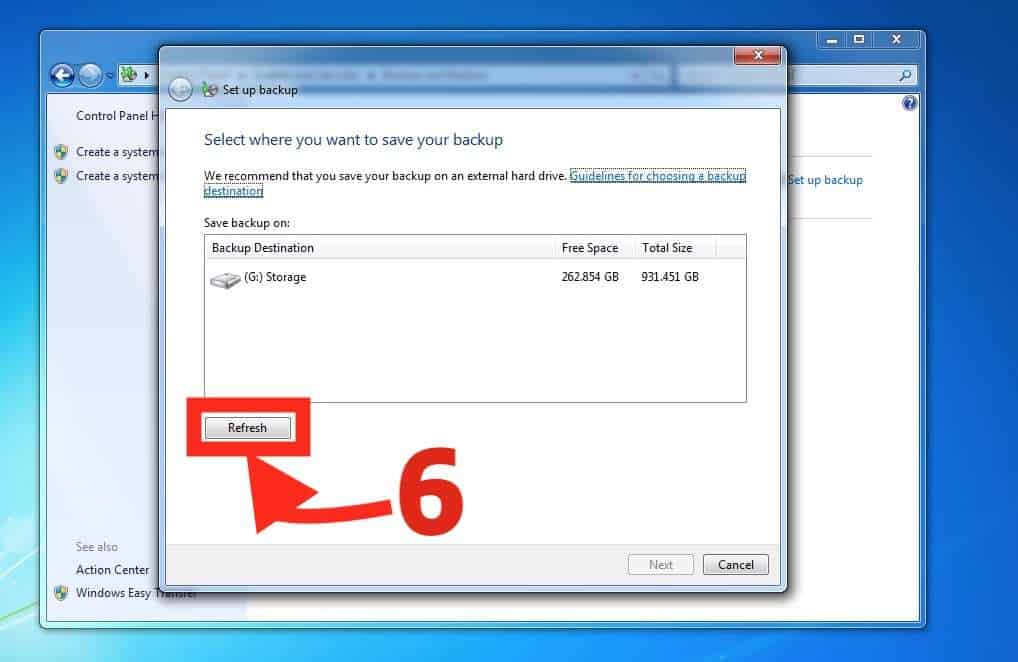
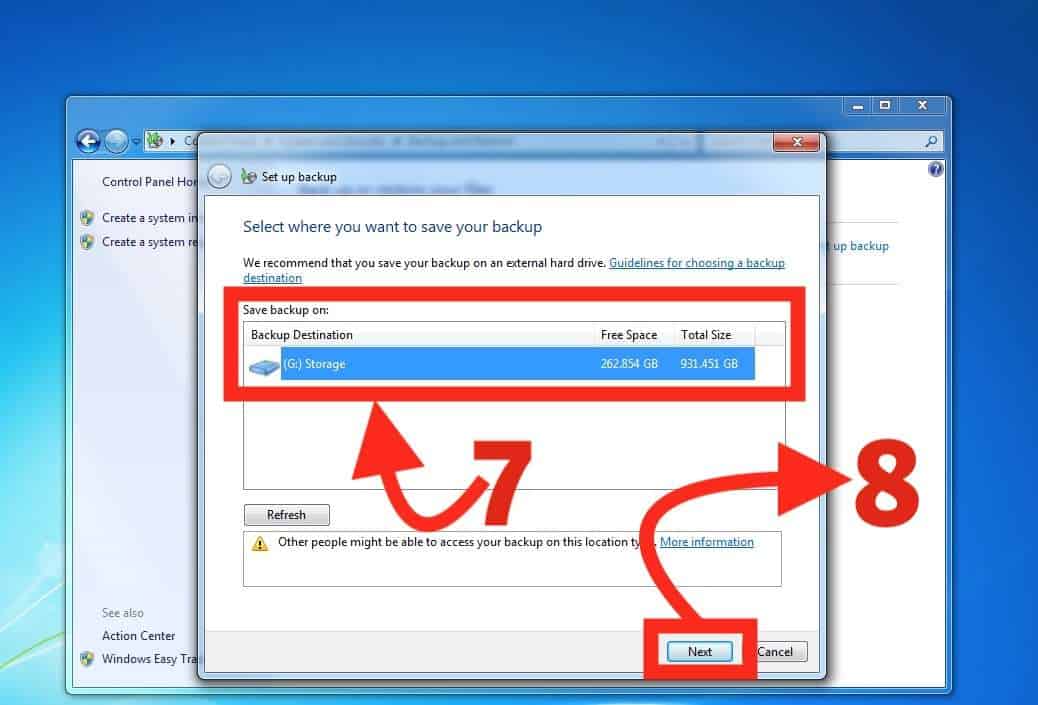
Select Set up backup and choose the external drive (or another location) where you want your backups to be stored.
Select files to back up:
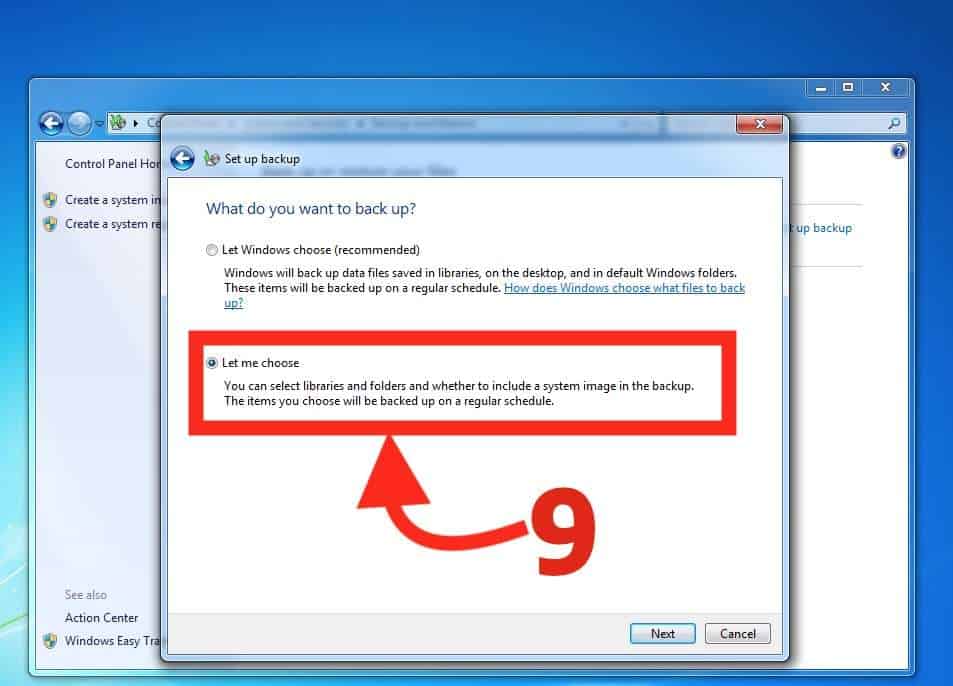
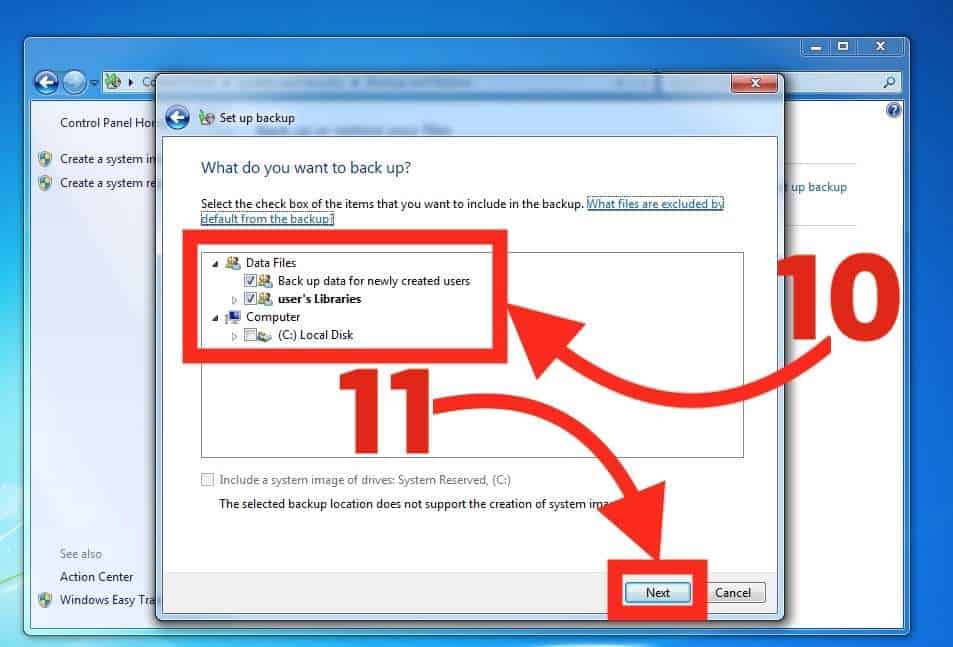
You can either allow Windows to choose what to back up (recommended) or manually select specific files and folders.
Schedule your backup:
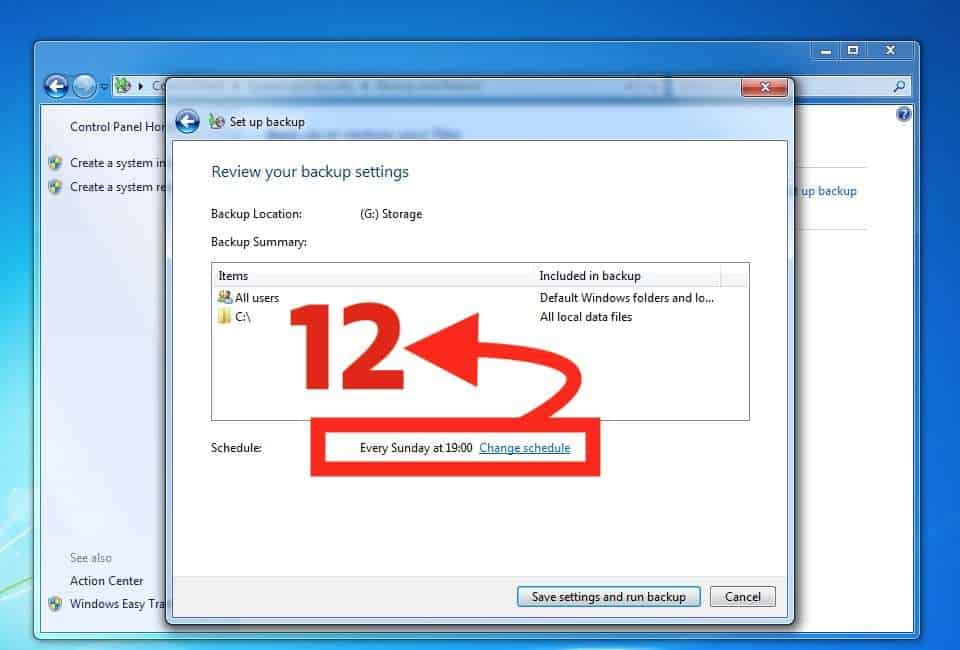
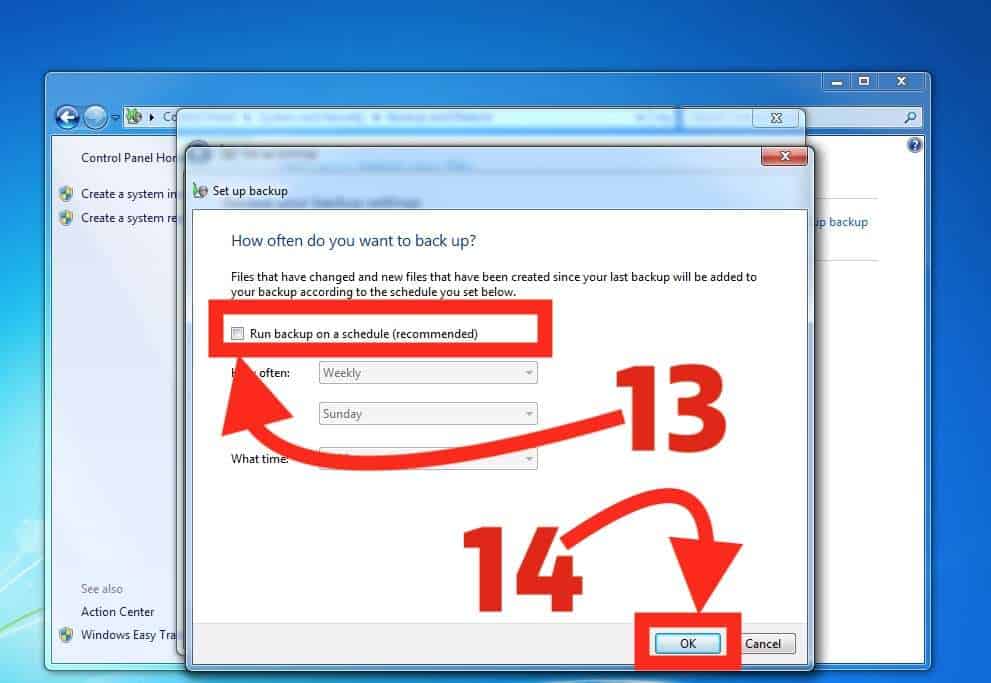
You can schedule your backups to run automatically—either daily, weekly, or monthly depending on your preferences.
Run the backup:
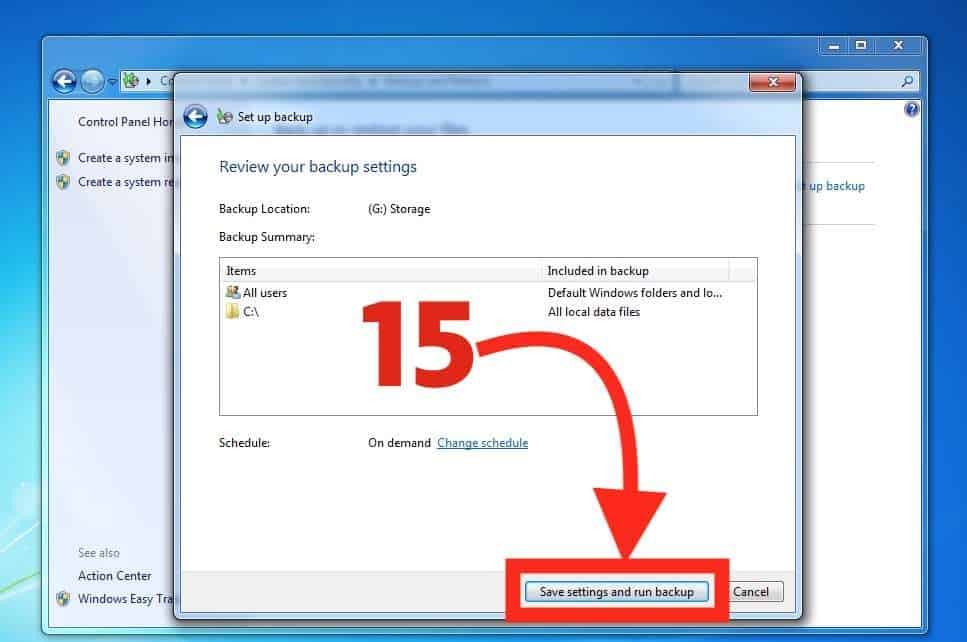
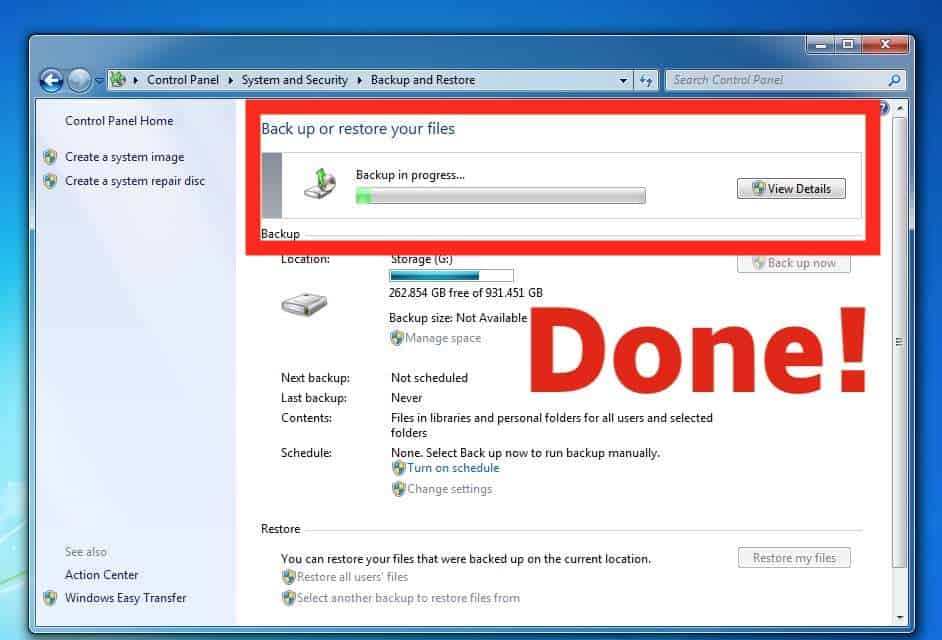
Click Save settings and run backup to initiate the process.
Step 3: Creating a Full System Image for Windows 7
For more comprehensive protection for Backing up your Data in Windows 7, consider creating a system image. A system image is a complete copy of your computer’s hard drive, including the operating system, settings, programs, and files. This allows you to restore your entire system in case of a critical failure or malware attack.
Here’s how to create a system image in Windows 7:
Open Backup and Restore:
Same steps as before: Control Panel > System and Security > Backup and Restore.
Click on Create a system image located on the left panel.
Choose where you want to save the system image—this could be an external hard drive, DVDs, or a network location.
Follow the on-screen instructions to complete the process.
Start Menu ≫ Control PanelClick ≫ System SecuritySystem-Security-Windows-Seven-7-Backup-RestoreBackup-Back-Up-Restore-System-Security-Windows-Seven-7-Backup-RestoreSetup-Set-Up-Refresh-Backup-Back-Up-Restore-System-Security-Windows-Seven-7-Backup-RestoreSelect-Drive-Next-Backup-Back-Up-Restore-System-Security-Windows-Seven-7-Backup-RestoreLet Me Choose-Restore-System-Security-Windows-Seven-7-Backup-RestoreSelect-Files-Next-Backup-Back-Up-Restore-System-Security-Windows-Seven-7-Backup-RestoreReview-Backup-Back-Up-Restore-System-Security-Windows-Seven-7-Backup-RestoreSchedule-Restore-System-Security-Windows-Seven-7-Backup-RestoreSave-Settings-Security-Windows-Seven-7-Backup-RestoreDone-Complete Security-Windows-Seven-7-Backup-Restore
A system image offers the ultimate fallback, allowing you to restore your computer to its exact state at the time of backup.
Step 4: Verifying Your Backup
Once your backup is complete, it’s essential to verify that the data has been backed up correctly. This extra step ensures that if you ever need to restore your files, they will be readily available.
Here’s how to verify your backup:
Check your external drive or cloud location to ensure the files were saved properly.
Test a file by restoring it to your system to make sure the backup works.
Review the backup log: Windows 7 provides a backup log that you can check to see if there were any errors during the process.
Step 5: Automating Your Backup Process
To ensure your data is always protected, you can set up automatic backups using Backup and Restore or third-party software like EaseUS Todo Backup or Acronis True Image. Automatic backups run in the background, saving you time and effort while keeping your data secure.
How to automate backups in Windows 7:
Open Backup and Restore.
Set up your backup schedule to run automatically on the frequency you prefer (daily, weekly, or monthly).
Let Windows handle the rest.
Automating your backup process ensures you never forget to save new files, providing constant protection.
Conclusion: Safeguard Yourself by Backing up your Data in Windows 7
With Windows 7 no longer receiving security updates from Microsoft, now is the time to take data protection into your own hands. Whether you choose an external hard drive, cloud storage, or both, setting up a reliable backup system ensures that your files are safe no matter what happens.
Don’t risk losing your valuable data—start backing up your data in Windows 7 today. And if you need expert assistance, the team at Kingfisher Computers is here to help you every step of the way.
The Illusion of Stability in Modern Updates For most users, operating system updates are something that simply happen. They arrive quietly, often installing in the background, requiring little more than…
Macbook Neo, How Does It Compare To Air & Pro? Over the last few years the laptop market has experienced one of the most significant architectural changes in its history.…
Apple’s latest product announcements mark one of the most significant shifts in the Mac lineup in more than a decade. While Apple routinely updates its hardware with faster chips, incremental…
There is a particular kind of frustration that only a slow computer can produce. It is not dramatic. It is not urgent. It does not scream for attention. Instead, it…
In an era where nearly every aspect of personal computer maintenance and professional life is mediated through digital systems, your computer is no longer a luxury device — it is…
Phone says charging but battery not increasing is one of the most frustrating problems smartphone users face. You plug it in.The lightning bolt appears.It says “Charging.” But the battery percentage…
Apple’s rumour cycle always looks like a thousand disconnected leaks — until you line them up and notice the same themes repeating: AI-first silicon, camera and display differentiation, form-factor experiments (foldables / spatial…
Wi-Fi connected but no internet is one of the most frustrating messages you can see on a computer or laptop. The Wi-Fi icon shows full bars.It says “Connected.”But websites won’t…
Unfortunately, there was an error submitting your request.
Please try again later, or reach out to us directly. You can call us at +44 1429 280955 or email us at sales@kingfishercomputers.co.uk for assistance. We’re here to help you get your computer back up and running!
We’ve received your booking, Our team will get in touch with you shortly to confirm the details. You’re one step closer to having your computer fixed! If you have any urgent questions, feel free to contact us. Otherwise, sit back, and we’ll handle the rest.